Digital Hardness Tester/Digital Rockwell Hardness Testers/Hardness Testers
Model No. 900-331D
Features
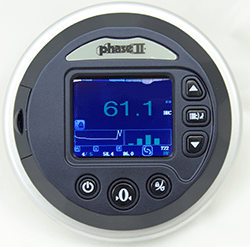
- Works on all standard Rockwell Hardness Scales including HRA, HRBW, HRC, HRE, HRF among many others. And converts to Brinell (HB) and Vickers (HV)
- Direct Digital Reading
- Automatic conversions to Brinell, Vickers, etc.
- Advanced design, easy to operate
- Engineered to obtain highly sensitive and accurate readings
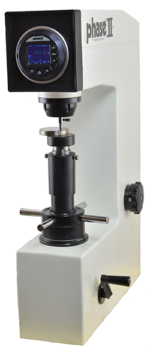
This “NEW” hardness tester combines our best selling 900-331 rockwell hardness tester with our new 9500 series digital indicator upgrade. This brilliant combination gives you the very best functions of a digital Rockwell hardness tester yet has the ease of use of our analog hardness testers. Utilizing the guidelines of ASTM E-18, the 900-331D hardness tester will offer unmatched repeatability in all standard Rockwell Hardness scales (table shown below). A perfect, rugged performer suited for any environment including heat treat facilities, tool rooms, workshops, laboratories and inspection labs. Lifetime technical support is included on all Phase II Hardness Testers. So test away with confidence and a level of accuracy you will only find at Phase II.
For full conformance to the latest Rockwell Hardness Tester
E-18-20 specification, please call (201) 962-7373
Features: Model No. 900-331D Rockwell Hardness Testers:
- Direct Digital Reading
- Automatic conversions to Brinell, Vickers, etc.
- Advanced design, easy to operate
- Engineered to obtain highly sensitive and accurate readings
- Conforms to ASTM E-18 Perfect for laboratories, workshops, tool rooms, inspection labs, etc.
Specifications:
| Minor Load | 10Kgf |
|---|---|
| Major Load | 60Kgf, 100Kgf, 150Kgf |
| Test Force Application | Dead Weight |
| Test Force Control | Hydraulic Dashpot System |
| Results Display | Digital LCD |
| Vertical Capacity | 6.7 in. |
| Throat Depth | 6.6 in. |
| Height | 30.0 in. |
| Width | 8.50 in. |
| Depth | 20.0 in. |
| Shipping Weight | 242 lbs. |
Accessories:
- C-scale Diamond Indento
- 1/16″ Ball Indentor
- 3- HRC Test Blocks
- 1- HRB Test Block
- Test Table 5.87″ (150mm)
- Flat Anvil 2.5″ (63mm)
- Spot Anvil .38: (10mm)
- Std. Vee Anvil
- Accessory Case
- Dust Cover


Options:
- NIST/ASTM certified hardness test blocks, penetrators and kits are available.
Rockwell Hardness Tester Scale/Indentor/Load chart
| Scale Symbol | Indenter Type Ball dimensions indicate diameter |
Preliminary Force N (kgf)> | Total Force N (kgf) | Typical Application |
|---|---|---|---|---|
| A | Spheroconical Diamond | 98.07 (10) | 588.4 (60) | Cemented carbides, thin steel and shallow case hardened steel |
| B | Ball 1/16″ (1.588mm) | 98.07 (10) | 980.7 (100) | Copper alloys, soft steels, alum. Alloys, malleable iron, etc. |
| C | Spheroconical Diamond | 98.07 (10) | 1471 (150) | Steel, hard cast irons,pearltic malleable iron, titanium, deep case hardened steel & other material harder than HRB 100 |
| D | Spheroconical Diamond | 98.07 (10) | 980.7 (100) | Thin steel and medium case hardened steel and pearlitic malleable iron |
| E | Ball – 1/8″ (3.175mm) | 98.07 (10) | 980.7 (100) | Cast iron, aluminum&magnesium alloys and bearing metals |
| F | Ball – 1/16″ (1.588mm) | 98.07 (10) | 588.4 (60) | Annealed copper alloys, and thin soft sheet metals |
| G | Ball – 1/16″ (1.588mm) | 98.07 (10) | 1471 (150) | Malleable irons, copper-nckel-zinc and cupronickel alloys |
| H | Ball – 1/8″ (3.175mm) | 98.07 (10) | 588.4 (60) | Aluminum, zinc and lead |
| K | Ball – 1/8″ (3.175mm) | 98.07 (10) | 1471 (150) | Bearing metals and other very soft or thin materials. Use smallest ball and heaviest load that does not give anvil effect |
| L | Ball – 1/4″ (6.350mm) | 98.07 (10) | 588.4 (60) | |
| M | Ball – 1/4″ (6.350mm) | 98.07 (10) | 980.7 (100) | |
| P | Ball – 1/4″ (6.350mm) | 98.07 (10) | 1471 (150) | |
| R | Ball – 1/2″ (12.70mm) | 98.07 (10) | 588.4 (60) | |
| S | Ball – 1/2″ (12.70mm) | 98.07 (10) | 980.7 (100) | |
| V | Ball – 1/2″ (12.70mm) | 98.07 (10) | 1471 (150) |
HARNDESS TESTING RESOURCES:
- REBUILT INVENTORY W/ FULL WARRANTY
- PHASE II WARRANTY CARD
- PHASE II SAMPLE EVALUATION SHEETS
- HARDNESS TESTER CONVERSION CHART
- PRINCIPLE OF ROCKWELL HARDNESS TESTING
- ROUNDNESS CORRECTION CHART FOR HARNDESS TESTING
- PORTABLE HARDNESS TESTERS
- MINIMUM THICKNESS CHART FOR ROCKWELL HARDNESS TESTING
- ROCKWELL HARDNESS SCALE INDENTOR LOAD CHART
- NIST LINKS
- NIST SCALE HISTORY
- ASTM LINKS


